
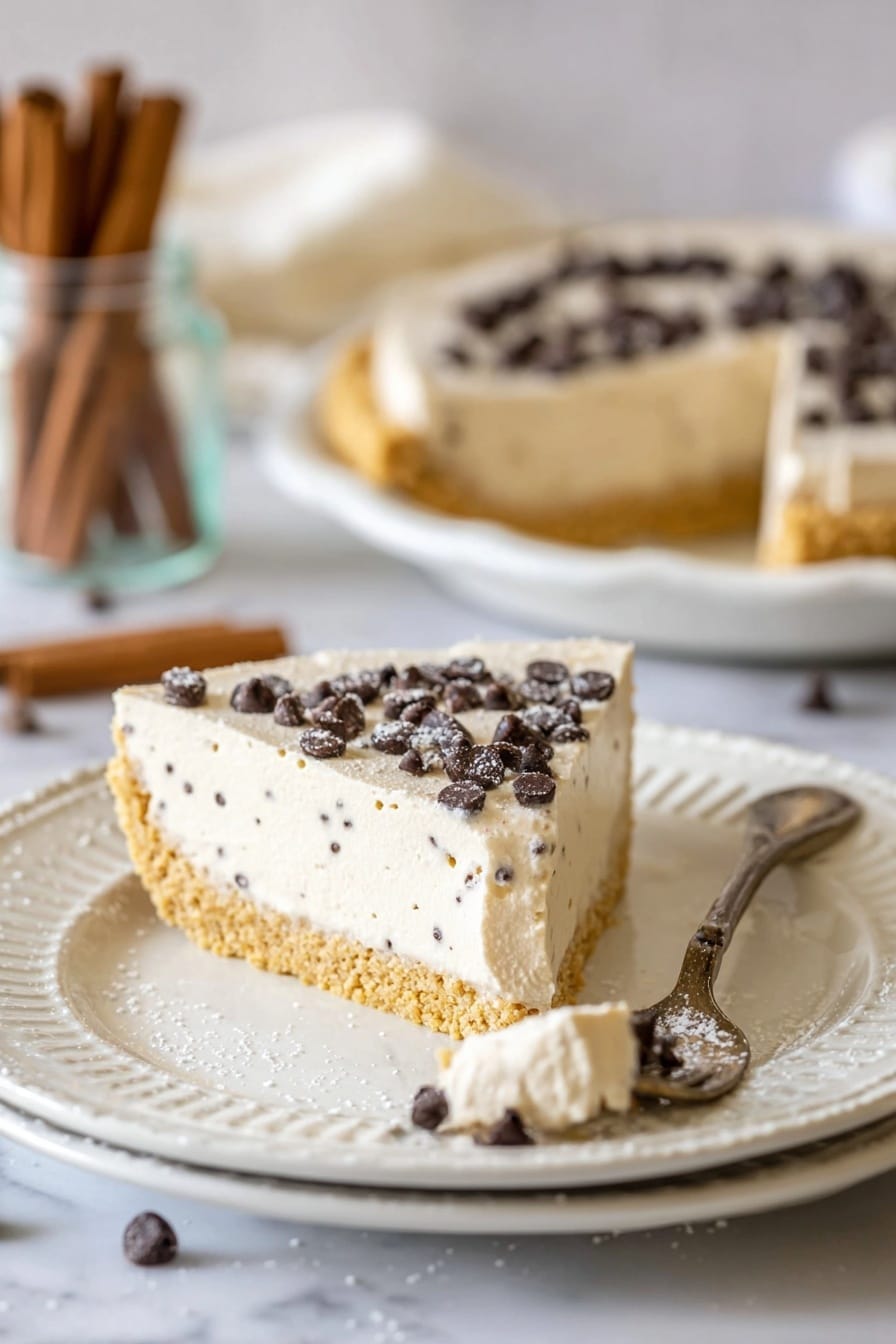
If you’re looking for a dessert that combines the best of creamy indulgence with a perfectly crisp crust, then this Cannoli Tart Recipe is your new go-to treat. Imagine the luscious flavors of a classic cannoli—sweet ricotta (or in this case, mascarpone) filling mixed with hints of vanilla and cinnamon, nestled inside a buttery graham cracker crust and topped with mini chocolate chips. It’s a show-stopper that’s easier to make than you’d think!
Why You Should Make This Recipe
Unbelievably creamy filling: The mascarpone and whipped cream blend creates a smooth, dreamy texture that feels like a little bit of heaven in every bite.
Simple, wholesome ingredients: No fancy or hard-to-find stuff—just pantry essentials that come together beautifully.
Perfect balance of flavors: A just-right sweetness with hints of cinnamon and vanilla, complemented by the subtle crunch of chocolate chips.
Great for any occasion: Whether it’s a dinner party, family gathering, or just a special treat for yourself, this tart impresses without stressing you out.
Ingredients & Substitutions
This Cannoli Tart Recipe relies on a handful of simple ingredients that each play an essential role. The graham cracker crust offers that pleasing crunch and buttery base, the mascarpone brings richness and creaminess, and the lightly sweetened whipped cream adds softness and lightness. A sprinkle of cinnamon and vanilla elevates the flavor with warm, comforting notes.
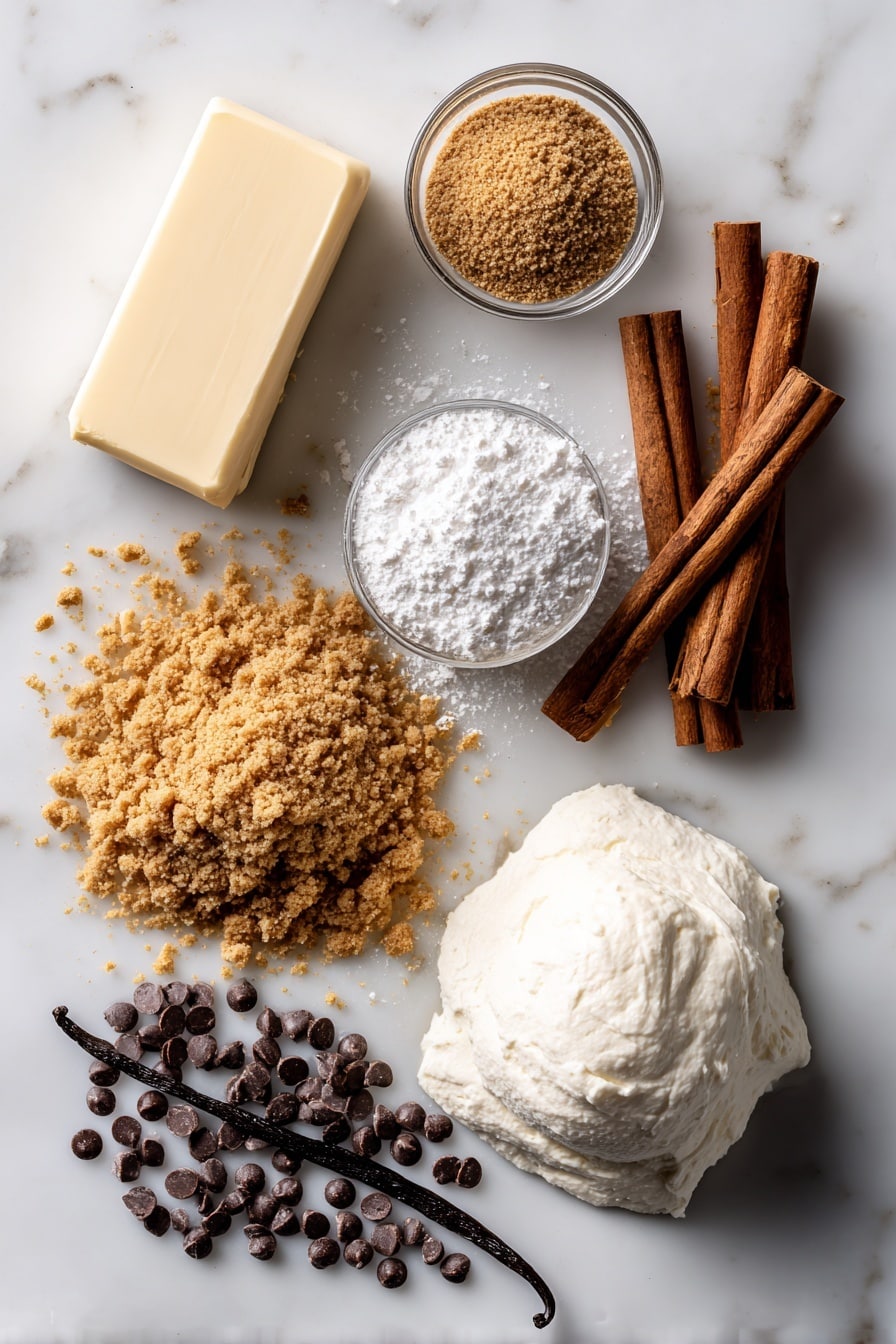
- Graham cracker crumbs: Use finely crushed crumbs for a sturdy yet tender crust; you can substitute with digestive biscuits if preferred.
- Unsalted butter: Melted to bind the crust together perfectly and lend a rich flavor without overpowering sweetness.
- Mascarpone cheese: The star of the filling, delivering creamy texture; if unavailable, you might try ricotta mixed with a bit of cream for similar results.
- Heavy whipping cream: Chilled and whipped to stiff peaks, it’s what makes the filling light and airy.
- Powdered sugar: For a smooth sweetness that dissolves seamlessly into the filling and cream.
- Vanilla extract & ground cinnamon: Tiny additions that create a warm, inviting flavor profile.
- Mini chocolate chips: These add delightful pops of chocolate crunch on top.
How to Make Cannoli Tart Recipe
Step 1: Prepare the Crust
Start by preheating your oven to 325°F and giving your 9-inch tart pan a quick spray with non-stick baking spray. Mix together the graham cracker crumbs and sugar in a bowl, then stir in the melted butter until everything is moistened. Press this crumbly mix firmly into the tart pan’s bottom and sides—using the flat bottom of a measuring cup helps make those edges smooth and tight. Pop it in the oven to bake for just 7 minutes. This quick bake sets the crust and brings out a lovely toasty flavor. Let it cool completely before moving on.
Step 2: Whip up the Filling
For that irresistible filling, gently blend the mascarpone cheese, vanilla extract, cinnamon, and half of the powdered sugar. Be careful not to overmix—keeping it slow and gentle preserves the luscious texture and prevents the mascarpone from becoming watery. In a separate bowl, whip the cold heavy cream with the remaining powdered sugar until stiff peaks form. Carefully fold the whipped cream into the mascarpone mixture in two batches, preserving all that light fluffiness. This blend is pure comfort food in creamy form.
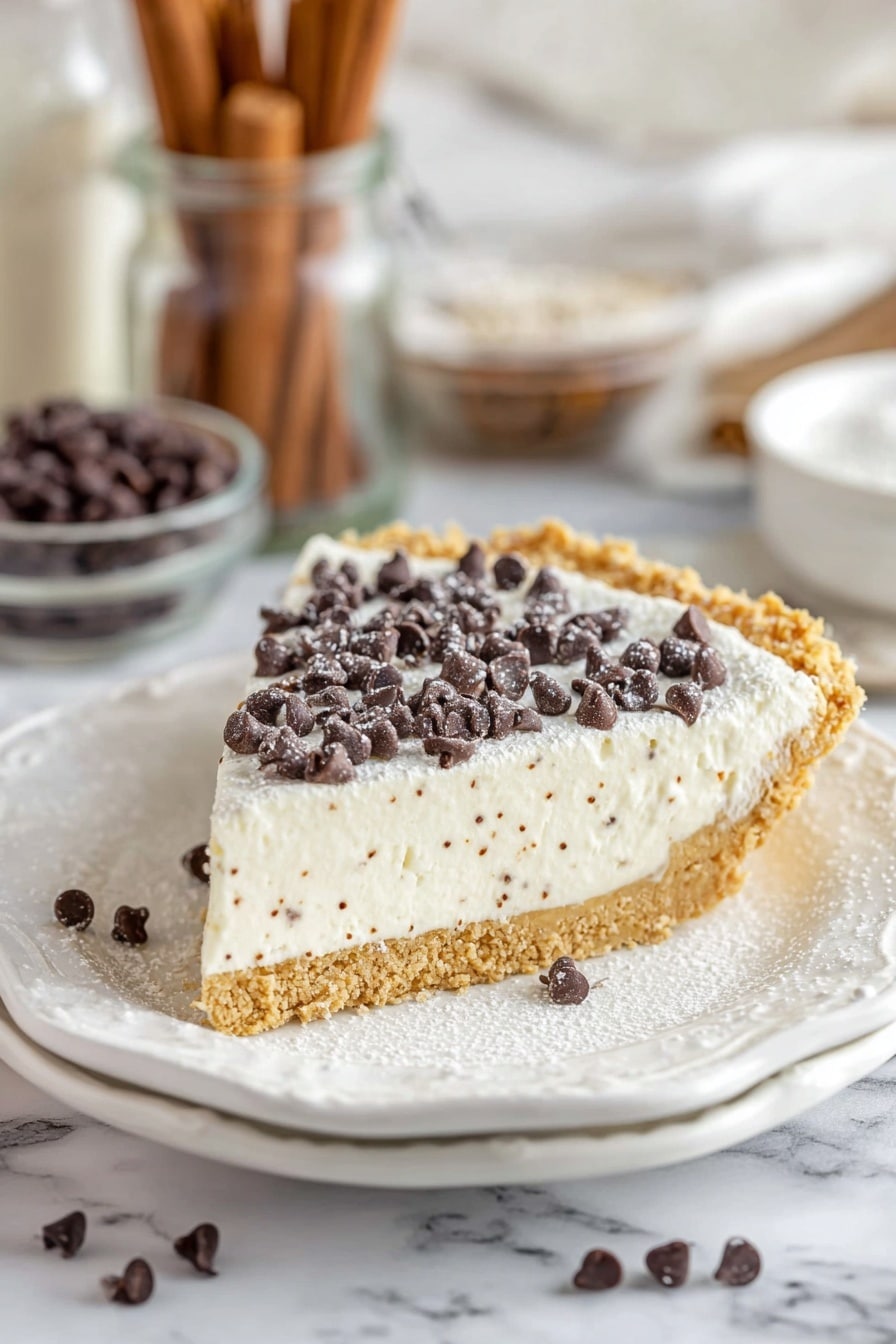
Step 3: Assemble and Chill
Spoon the luscious filling evenly into your cooled crust, smoothing it out with a spatula. Now the fun part: sprinkle a generous handful of mini chocolate chips over the top for a little crunch and extra sweetness. Cover it with plastic wrap or an airtight container and let it chill in the fridge for 2-3 hours, allowing the filling to firm up into that perfect sliceable texture. Before serving, a light dusting of powdered sugar can add a pretty finishing touch.
How to Serve Cannoli Tart Recipe
Garnishes
Keep it simple yet elegant with a dusting of powdered sugar or a sprinkle of extra mini chocolate chips. Fresh mint leaves or a few candied orange zest strips can also add a fresh burst of color and fragrance, styling your tart beautifully for guests or special occasions.
Side Dishes
This Cannoli Tart pairs wonderfully with a cup of strong espresso or a delicate herbal tea, both complementing the creaminess with their robust or soothing flavors. For a light contrast, serve alongside fresh berries or a citrus salad to brighten things up.
Creative Ways to Present
Try cutting the tart into smaller, individual mini tarts for elegant finger food at a party. Or, drizzle with a bit of melted dark chocolate or caramel sauce before serving to add a dramatic flair that looks and tastes divine. You could even layer fresh fruit on top to add freshness and vibrant color.
Make Ahead and Storage
Storing Leftovers
Once made, cover the tart tightly with plastic wrap or store in an airtight container in the fridge. It keeps beautifully for up to 4-5 days, making it a great dessert to prepare in advance. The flavors have time to meld, often tasting even better the next day!
Freezing
Freezing is not the best option for this tart because the delicate texture of the mascarpone filling can change and become watery once thawed. If you must freeze, freeze unfilled crust separately and add the filling fresh when ready to serve.
Reheating
This dessert is best served chilled, so no reheating is necessary. Simply let it sit at room temperature for 10-15 minutes before serving if you prefer a slightly softer texture, but keep it cool to maintain the creamy consistency of the filling.
FAQs
-
Can I substitute mascarpone cheese in this Cannoli Tart Recipe?
Yes, if mascarpone is hard to find, you can use ricotta cheese blended with a little heavy cream to replicate the creamy texture. Note that the flavor might be slightly different, but it still makes a delicious filling.
-
How long does this tart need to chill before serving?
The tart should chill for at least 2 to 3 hours in the refrigerator to allow the filling to set properly, making it easier to slice and serving it with that perfect creamy texture.
-
Can I make the crust without baking it?
While the recipe calls for a short bake to set the crust, you can skip baking if pressed for time. Just press the crust firmly into the pan and refrigerate it for a bit to help it hold shape. Keep in mind baking yields a better texture and flavor.
-
What’s the best way to prevent the mascarpone from becoming watery?
Use mascarpone that’s chilled but not overly cold—if it’s too warm or whipped too vigorously, it can break down. Gently fold ingredients together without high-speed mixing to maintain a creamy consistency.
Final Thoughts
Honestly, this Cannoli Tart Recipe has quickly become a favorite in my kitchen and I hope it will be yours too! It’s effortlessly elegant, incredibly tasty, and sure to delight everyone lucky enough to get a slice. So go ahead, gather your ingredients, whip it up, and enjoy a little slice of Italian-inspired joy any day of the week.
Print
Cannoli Tart Recipe
- Prep Time: 30 minutes
- Cook Time: 7 minutes
- Total Time: 2 hours 37 minutes
- Yield: 8–10 slices 1x
- Category: Dessert
- Method: Baking
- Cuisine: Italian
- Diet: Vegetarian
Description
This delicious Cannoli Tart offers a delightful twist on traditional cannoli flavors with a crunchy graham cracker crust filled with a smooth mascarpone and whipped cream mixture, lightly sweetened with cinnamon and vanilla, and topped with mini chocolate chips. Perfect for a light, elegant dessert that’s easy to prepare and sure to impress.
Ingredients
Crust
- 1 1/4 cups (168g) graham cracker crumbs
- 3 tbsp (39g) sugar
- 5 tbsp (70g) unsalted butter, melted
Filling
- 12 oz mascarpone cheese
- 1/2 tsp vanilla extract
- 1/2 tsp ground cinnamon
- 3/4 cup (86g) powdered sugar, divided
- 3/4 cup (180ml) heavy whipping cream, cold
- Mini chocolate chips, for topping
Instructions
- Make the crust: Spray a 9-inch tart pan with non-stick baking spray and preheat oven to 325°F. Combine graham cracker crumbs and sugar in a medium bowl. Add melted butter and mix until well combined. Press the mixture firmly into the bottom and up the sides of the tart pan using a measuring cup or glass and your fingers for the edges. Bake for 7 minutes, then remove and let cool completely. Refrigerate or freeze to speed cooling if desired.
- Prepare the filling: In a mixer bowl, gently combine mascarpone cheese, vanilla extract, cinnamon, and 1/2 cup powdered sugar without overmixing to prevent the mascarpone from becoming watery. Set aside.
- Whip the cream: In a large mixer bowl, whip the cold heavy cream alongside the remaining 1/4 cup powdered sugar on high speed until stiff peaks form.
- Fold together: Gently fold the whipped cream into the mascarpone mixture in two parts, being careful to maintain the airy texture.
- Assemble the tart: Spoon and spread the filling evenly into the cooled crust. Sprinkle the top with mini chocolate chips.
- Chill and serve: Cover or store the tart in an airtight container and refrigerate for 2-3 hours until firm. Optionally, dust with additional powdered sugar before serving. Store leftovers in an airtight container and consume within 4-5 days.
Notes
- Mascarpone cheese can become watery if it gets too warm. Use it straight from the fridge or allow it to sit at room temperature for 5-10 minutes if too firm.
- Pressing the crust firmly is key to a sturdy tart base that holds up well to the creamy filling.
- Do not overmix the mascarpone mixture to keep the texture smooth and creamy.
- Refrigerating the tart for at least 2 hours is essential for the filling to firm up properly.


