If you’re looking for a truly special treat to impress your sweetheart this season, this Homemade Red Velvet Cake for Valentine’s Day Recipe is an absolute showstopper. With its tender crumb, vibrant color, and luscious cream cheese frosting, it’s the perfect dessert to share and savor together!
Why You Should Make This Recipe
Richly moist and tender: The combination of cake flour, buttermilk, and oil ensures a soft, melt-in-your-mouth texture that feels indulgent with every bite.
Classic yet customizable: The red velvet flavor is a perfect balance of subtle cocoa with tangy vinegar, but you can always adjust the intensity with your favorite food coloring.
Perfect for Valentine’s Day: Its striking red color and creamy frosting make it a romantic centerpiece for any celebration.
Family and beginner-friendly: Simple techniques and accessible ingredients make this recipe approachable for all skill levels.

Ingredients & Substitutions
This Homemade Red Velvet Cake for Valentine’s Day Recipe leans on ingredients that are straightforward but essential. Each component plays a role from tenderizing the crumb to delivering that signature color and subtle cocoa undertones.

- Cake flour: Provides a lighter texture than all-purpose flour, crucial for that delicate crumb.
- Unsweetened cocoa powder: Adds a gentle depth of chocolate flavor without overpowering the cake.
- Buttermilk: Reacts with baking soda to create a tender, fluffy crumb and adds a slight tang.
- Red food coloring: The star of the show for that vibrant Valentine’s red—gel or liquid works fine.
- Vinegar: Acts with the baking soda to help the cake rise and enhances the tangy flavor profile.
- Cream cheese and butter: Combine for a luxuriously smooth frosting with a perfect balance of sweet and tangy.
How to Make Homemade Red Velvet Cake for Valentine’s Day Recipe
Step 1: Prep the Pans and Dry Ingredients
Start by preheating your oven to 350°F and preparing two 9- or 8-inch cake pans—line the bottoms with parchment paper circles and spray the sides to prevent sticking. Then whisk together the cake flour, baking soda, cocoa powder, and salt in a large bowl until evenly combined. This dry mix forms the base of your cake’s structure and flavor.
Step 2: Cream Butter and Sugar, Add Oil
Using a stand mixer fitted with a paddle attachment, beat the softened butter and granulated sugar on high speed for 3 to 4 minutes—this crucial step creates a light, fluffy base that traps air for a tender cake. Next, mix in the vegetable oil while scraping down the sides to keep everything well incorporated.
Step 3: Incorporate Eggs, Vanilla, Vinegar, and Food Coloring
Add your eggs one at a time, beating on medium-high speed after each addition so everything blends beautifully. Stir in the vanilla extract and distilled white vinegar to boost flavor and help the cake rise. Now, the fun part: add the red liquid or gel food coloring, adjusting until you get that perfect vibrant hue that screams Valentine’s Day!
Step 4: Alternate Adding Dry Ingredients and Buttermilk
Turn your mixer to low speed and add the flour mixture in two or three additions, alternating with the buttermilk. Mix just until combined each time to avoid overworking the batter, which keeps your cake tender. Scrape the bowl often to ensure everything is evenly mixed but not overdone.
Step 5: Bake and Cool
Divide the batter equally between your prepared pans and smooth the tops. Bake for 30–35 minutes for 9-inch pans, or 38–43 minutes for 8-inch pans, until a toothpick inserted in the center comes out with a few moist crumbs. Resist the urge to overbake; a moist crumb is key! Allow cakes to cool completely before frosting.
Step 6: Make the Cream Cheese Frosting
Beat softened cream cheese and butter until smooth in a large bowl using a handheld mixer. Gradually add the powdered sugar and cream or milk; start mixing on low to combine, then increase speed and whip until fluffy. Stir in vanilla extract and a pinch of salt to balance the sweetness. This frosting brings that classic tangy-smooth finish that pairs perfectly with the rich cake.
Step 7: Assemble and Decorate
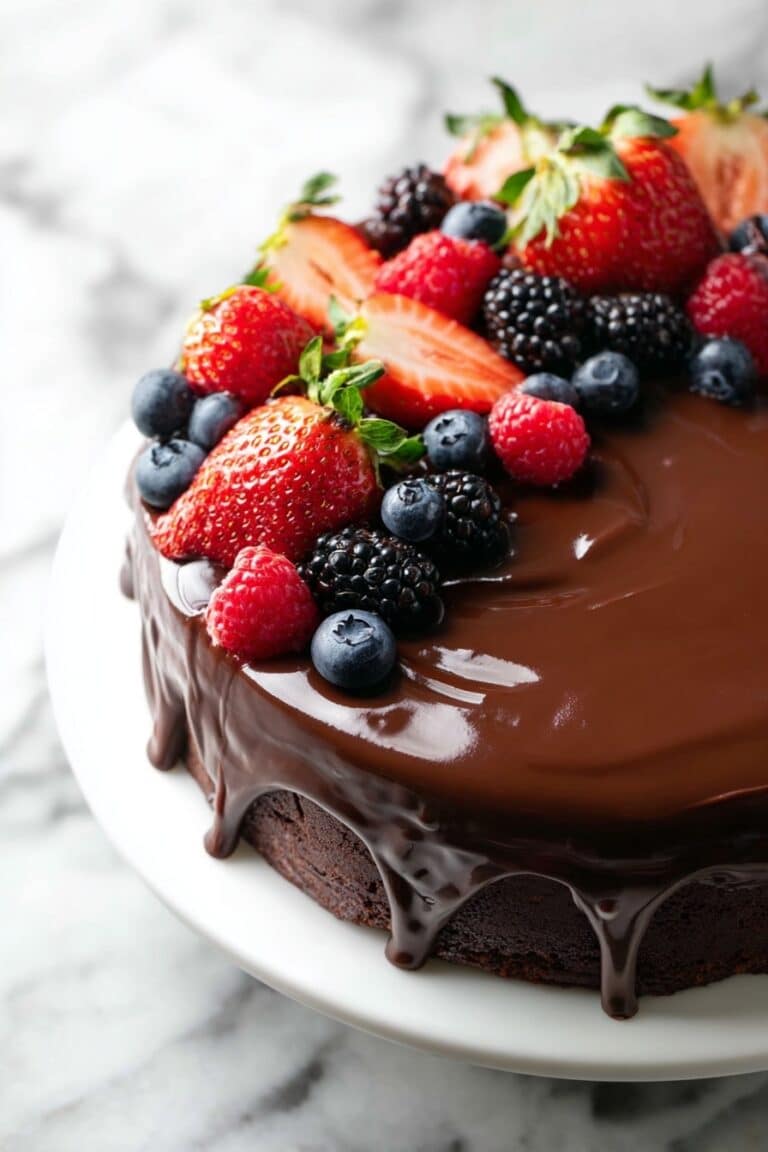
Level the cake layers if needed so they stack evenly, saving any scraps to crumble later. Spread a generous amount of cream cheese frosting between the layers and over the top and sides. Sprinkle the reserved crumbs on top for a charming, rustic touch and slice to serve to your lucky Valentine.
How to Serve Homemade Red Velvet Cake for Valentine’s Day Recipe

Garnishes
To make your cake extra special, decorate with fresh berries like raspberries or strawberries to complement the tangy frosting and add a pop of freshness. Edible rose petals or a light dusting of cocoa powder can also elevate the presentation beautifully for Valentine’s Day charm.
Side Dishes
This cake pairs wonderfully with a scoop of vanilla bean ice cream or a small glass of bubbly rosé. A cup of rich coffee or a creamy latte also enhances the red velvet flavor, making it ideal for an intimate dessert setting or afternoon tea.
Creative Ways to Present
Try serving mini versions as individual cupcakes decorated with piped frosting roses for bite-sized romance. Or go for a rustic look by layering the cake in a clear trifle dish with fresh strawberries and whipped cream for a stunning Valentine’s Day treat that’s equal parts beautiful and delicious.
Make Ahead and Storage
Storing Leftovers
Store any leftover Homemade Red Velvet Cake for Valentine’s Day Recipe tightly wrapped in plastic wrap or in an airtight container in the refrigerator. The cream cheese frosting means it needs to stay cold, and it will last deliciously for up to 4 days.
Freezing
You can freeze un-frosted cake layers wrapped well in plastic and foil for up to 3 months. When ready, thaw overnight in the refrigerator before frosting and assembling. For frosted cake, freezing is possible but may affect frosting texture, so freezing layers separately is preferred.
Reheating
If you prefer a slightly softer texture, let the chilled cake sit at room temperature for 30 minutes before serving. Avoid microwaving as this can affect the frosting’s creaminess and cake moisture.
FAQs
-
Can I use regular all-purpose flour instead of cake flour?
While cake flour is ideal for a tender crumb, you can substitute all-purpose flour by removing 2 tablespoons per cup and replacing with cornstarch to mimic cake flour’s lower protein content. This helps keep your red velvet cake light and soft.
-
Is there a substitute for buttermilk?
If you don’t have buttermilk, simply add 1 tablespoon of lemon juice or white vinegar to a cup of milk and let it sit for 5 minutes before using—it provides the acidity needed for the perfect rise and texture.
- Why does the recipe include vinegar?
The vinegar reacts with the baking soda to create leavening bubbles for a fluffy cake and also boosts the signature tangy flavor that complements the cocoa and cream cheese frosting.
- How can I make this cake dairy-free?
For a dairy-free version, substitute the butter with a dairy-free margarine, use plant-based milk mixed with lemon juice as a buttermilk substitute, and try a vegan cream cheese alternative for the frosting.
Final Thoughts
Whipping up this Homemade Red Velvet Cake for Valentine’s Day Recipe is a delightful way to show someone you care with your baking skills. Its classic flavors and stunning presentation make it a heartfelt celebration in every bite—so why not grab your apron and make your Valentine smile with this unforgettable cake?
Print
Homemade Red Velvet Cake for Valentine’s Day Recipe
- Prep Time: 30 minutes
- Cook Time: 35 minutes
- Total Time: 1 hour 5 minutes
- Yield: 1 2-layer 9-inch cake (serves 12-14) 1x
- Category: Dessert
- Method: Baking
- Cuisine: American
Description
This Homemade Red Velvet Cake is the perfect Valentine’s Day dessert featuring a moist, tender crumb infused with cocoa and buttermilk, layered with a luscious cream cheese frosting. Its vibrant red color and classic flavor make it a romantic and festive treat for any special occasion.
Ingredients
Cake
- 3 cups cake flour, scooped & leveled (354g)
- 1 teaspoon baking soda
- 3 Tablespoons unsweetened cocoa powder (22g)
- ½ teaspoon salt
- ½ cup salted butter, softened (113g)
- 2 cups granulated sugar (400g)
- 1 cup vegetable oil (224g)
- 3 large eggs, room temperature
- 1 Tablespoon vanilla extract
- 1 Tablespoon distilled white vinegar
- 2 Tablespoons red liquid food coloring (or 1 Tablespoon gel food coloring)
- 1 cup buttermilk, room temperature (240g)
Frosting
- 2 (8 ounce) packages cream cheese, softened
- ½ cup salted butter, softened (113g)
- 4 cups powdered sugar (520g)
- 2–3 Tablespoons cream or milk
- 2 teaspoons vanilla extract
- Pinch of salt
Instructions
- Prepare the pans and preheat oven: Preheat your oven to 350°F (175°C). Line two 9-inch or 8-inch cake pans with parchment paper circles on the bottoms and spray the sides with cooking spray. Set aside.
- Mix dry ingredients: In a large bowl, whisk together the cake flour, baking soda, cocoa powder, and salt until well combined. Set this mixture aside.
- Cream butter and sugar: Using a stand mixer fitted with a paddle attachment, beat the softened butter and granulated sugar on high speed for 3-4 minutes until light and fluffy. Add the vegetable oil and mix briefly, scraping down the sides of the bowl to incorporate all ingredients.
- Add eggs, vanilla, vinegar, and food coloring: Add the eggs one at a time, beating on medium-high speed until each egg is incorporated before adding the next. Then add the vanilla extract, distilled white vinegar, and the red food coloring. Mix until the color is evenly distributed and the batter is smooth.
- Combine wet and dry ingredients: Reduce the mixer speed to low. Alternately add the dry ingredient mixture and buttermilk in 2-3 additions, beginning and ending with the dry ingredients. Mix just until combined after each addition and scrape the bowl as needed to ensure even mixing but avoid overmixing.
- Bake the cake: Divide the batter evenly between the prepared pans. Bake for 30-35 minutes if using 9-inch pans or 38-43 minutes for 8-inch pans. The cake is done when a toothpick or cake tester inserted into the center comes out clean with a few crumbs. Be careful not to overbake. Remove from oven and allow cakes to cool completely in the pans.
- Make the frosting: In a large bowl, beat softened cream cheese and butter with a handheld mixer until smooth and creamy, about 1-2 minutes. Gradually add powdered sugar and cream or milk, starting on low speed to incorporate and then increasing to high speed, beating for 2 minutes until smooth and fluffy. Add vanilla extract and a pinch of salt, then beat again for a few seconds until combined.
- Assemble the cake: If needed, level the cooled cakes by trimming the domed tops for an even stacking surface. Reserve any trimmed scraps to crumble for decoration. Spread a layer of cream cheese frosting on the first cake layer, then place the second layer on top. Frost the top and sides of the cake with the remaining frosting. Sprinkle the top with cake crumbs if desired for decoration.
- Serve: Slice the cake using a sharp knife and serve immediately or chill before serving. Enjoy this classic red velvet delight perfect for Valentine’s Day celebrations.
Notes
- Room temperature ingredients, especially eggs and buttermilk, help create a smooth batter and better texture.
- Do not overmix the batter to avoid a dense cake; mix just until combined after adding wet and dry ingredients.
- If you prefer a deeper red color, adjust the amount of food coloring accordingly.
- Use cake flour for tender, soft crumb; all-purpose flour can be substituted but the texture will be slightly different.
- Make sure the cream cheese and butter for the frosting are very soft to avoid lumps.
- This cake is best served within 2 days but can be refrigerated up to 4 days; bring to room temperature before serving.


[1945]Milyun88: Slot Gacor, Login & Daftar – Link Alternatif Resmi & Download APK Milyun88 Philippines Experience the best milyun88 slot gacor at Milyun88 Philippines. Access our official milyun88 login, milyun88 daftar, and milyun88 link alternatif. Download milyun88 apk and start winning today! visit: milyun88
[1268]fb777pro slots|fb777pro login|fb777pro app|fb777pro casino|fb777pro register Join fb777pro, the premier online casino in the Philippines! Register today to play top-rated fb777pro slots, download the official fb777pro app, and enjoy a seamless fb777pro login for the ultimate gaming experience and big rewards. visit: fb777pro
[911]The Best Online Casino in the Philippines: Bet777 App Download, GCash Slots, and Fast Payouts. visit: bet777app
[4828]1plusph Casino: Best Online Slots in the Philippines. Quick Login, Easy Register, and App Download. Join 1plusph Casino for the best online slots in the Philippines. Enjoy fast 1plusph login, easy 1plusph register, and a quick 1plusph app download. Play premium 1plusph slot games and start winning big today! visit: 1plusph
Тем, кто только начинает, полезно пройти обучение xrumer https://www.olx.ua/d/uk/obyavlenie/progon-hrumerom-dr-50-po-ahrefs-uvelichu-reyting-domena-IDXnHrG.html, чтобы научиться работать с программой.