I’m beyond excited to share this incredibly delicious No-Bake Pumpkin Cheesecake Bars Recipe with you! It’s the perfect fall treat that combines creamy pumpkin goodness with a sweet, spiced crust — all without turning on the oven. These bars are rich, smooth, and bursting with cozy autumn flavors, making them an absolute must-try for pumpkin lovers everywhere.
Why You Should Make This Recipe
Effortlessly impressive dessert: No oven required, so you can whip up this cheesecake with minimal fuss.
Bold autumn flavors: The perfect blend of pumpkin, cinnamon, nutmeg, and warm spices makes each bite feel like fall in dessert form.
Delightfully creamy texture: The filling whips up into a luscious, airy consistency that melts in your mouth.
Crunchy, spiced crust: Made with Biscoff cookie crumbs and pecans, the crust gives you a perfect contrast to the smooth filling.

Ingredients & Substitutions
This No-Bake Pumpkin Cheesecake Bars Recipe relies on simple yet fantastic ingredients that each contribute something special—whether it’s creaminess, spice, or sweetness—making sure the final bars are nothing short of heavenly.

- Biscoff cookie crumbs: These add an irresistibly caramelized sweetness to the crust, making it a standout.
- Whole pecans: For a bit of texture and nutty depth that balances the sweetness.
- Cream cheese: The rich base that gives your cheesecake that classic tang and creaminess.
- Pumpkin puree: The star ingredient, bringing that unmistakable pumpkin flavor and vibrant color.
- Heavy whipping cream: Whipped in to add lightness and fluffy texture to the filling.
- Warm spices (cinnamon, nutmeg, cloves, ginger, allspice): Together, they create the perfect cozy spice blend essential for pumpkin desserts.
- Biscoff spread topping: A decadent finishing touch that complements the crust and adds extra flavor.
How to Make No-Bake Pumpkin Cheesecake Bars Recipe
Step 1: Make the Crust
Start by combining the Biscoff cookie crumbs, whole pecans, light brown sugar, cinnamon, and sea salt in a food processor. Pulse everything until the mixture is finely ground and perfectly combined. Then pour in the melted unsalted butter and mix until all the crumbs are well moistened. Press this fragrant blend firmly into a lined 9×9-inch pan, creating an even base. Pop it in the fridge for at least 30 minutes to firm up—this crust will be irresistible once chilled!
Step 2: Prepare the Filling
Using a large mixing bowl, beat the cream cheese until it’s silky-smooth. Slowly add powdered sugar, vanilla extract, and sea salt, mixing well to incorporate each ingredient fully. Next up, fold in the pumpkin puree along with the heavy whipping cream and that amazing mix of cinnamon, nutmeg, cloves, ginger, and allspice. Beat everything first on low to combine, then ramp up to medium-high speed and whip until you see medium-stiff peaks forming—just be careful not to overbeat! This creamy, spiced filling is what’s going to take your bars to the next level.
Step 3: Assemble and Chill
Spread that luscious pumpkin cheesecake filling evenly over the chilled crust. Then melt your Biscoff spread in the microwave until it’s just spreadable—a quick 15 to 30 seconds is usually perfect. Drizzle the melted spread on top of the filling. You can smooth it out with a spatula or create pretty swirls with a toothpick for a fun, artistic touch. Finally, pop the whole pan back in the fridge for at least 4 hours to let everything set beautifully.
How to Serve No-Bake Pumpkin Cheesecake Bars Recipe

Garnishes
Add a sprinkle of flaky sea salt on top just before serving to really enhance the sweetness and balance all those warm spices. You can also add a dusting of cinnamon or nutmeg for an extra festive look. For a little extra flair, a dollop of freshly whipped cream makes these bars completely irresistible.
Side Dishes
These pumpkin cheesecake bars shine as a stand-alone treat but also pair wonderfully with a hot cup of coffee or spiced chai tea. If you want to make it a full fall dessert experience, serve alongside roasted pecans or a simple fruit compote featuring cranberries or spiced apples.
Creative Ways to Present
Try cutting the bars into mini squares for bite-sized indulgence at parties or gatherings. For a fancy dessert platter, drizzle a bit of caramel sauce over the top right before serving. You could even layer these bars in a clear trifle dish with whipped cream and crushed Biscoff cookies for a stunning fall-themed parfait.
Make Ahead and Storage
Storing Leftovers
These bars keep beautifully in the refrigerator for up to 4 days. Keep them covered tightly so they stay fresh and don’t pick up any fridge odors. They’re a perfect make-ahead dessert for busy days or last-minute guests.
Freezing
Love to prep in advance? Wrap individual bars tightly in plastic wrap and place them in an airtight container or freezer bag. They freeze well for up to 2 months. When ready to enjoy, thaw overnight in the refrigerator for best texture.
Reheating
Since these are no-bake cheesecake bars, reheating isn’t necessary and might even affect their creamy texture. Instead, let them come to room temperature for about 15-20 minutes if you prefer a softer bite when serving.
FAQs
-
Can I use canned pumpkin for this No-Bake Pumpkin Cheesecake Bars Recipe?
Absolutely! Canned pumpkin puree works perfectly and is actually recommended for consistent texture and flavor. Just make sure you’re using pure pumpkin puree, not pumpkin pie filling, which contains added spices and sweeteners.
-
What if I don’t have a food processor for the crust?
No worries! You can crush the Biscoff cookies and pecans using a zip-top bag and a rolling pin. Just roll and crush everything until finely ground. Then mix with the melted butter by hand to form the crust.
-
Can this recipe be made vegan or dairy-free?
With some adjustments, yes! You can try dairy-free cream cheese and coconut cream instead of heavy whipping cream. Use a vegan butter substitute for the crust. Keep in mind, the texture might vary slightly but it’ll still taste delightful.
-
How do I get the Biscoff spread topping to swirl nicely?
Warm the Biscoff spread just enough until it becomes soft and spreadable—usually 15-30 seconds in the microwave. Drizzle it over the pumpkin layer and use a toothpick or the tip of a knife to gently swirl the spread into pretty patterns.
Final Thoughts
I can’t recommend this No-Bake Pumpkin Cheesecake Bars Recipe enough for anyone craving a luscious fall dessert without the hassle of baking. It’s smooth, flavorful, and downright addicting—perfect for cozy nights, parties, or anytime you want to fall in love with pumpkin all over again. Give it a try and watch it become your new seasonal favorite!
Print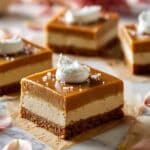
No-Bake Pumpkin Cheesecake Bars Recipe
- Prep Time: 20 minutes
- Cook Time: 0 minutes
- Total Time: 5 hours 20 minutes
- Yield: 16 bars 1x
- Category: Dessert
- Method: No-Cook
- Cuisine: American
- Diet: Vegetarian
Description
These No-Bake Pumpkin Cheesecake Bars combine the rich, creamy texture of a classic cheesecake with the warm spices of pumpkin pie, all atop a crunchy Biscoff cookie and pecan crust. Easy to prepare without any oven baking, these bars are perfect for fall gatherings or a delightful treat any time of year.
Ingredients
For the Crust:
- 2 1/3 cups Biscoff cookie crumbs
- 1/4 cup whole pecans
- 2 Tablespoons light brown sugar
- 1/4 teaspoon cinnamon
- 1/8 teaspoon sea salt
- 8 Tablespoons unsalted butter, melted
For the Filling:
- 16 ounces cream cheese, room temperature
- 1 1/4 cups powdered sugar
- 2 teaspoons pure vanilla extract
- 1/8 teaspoon sea salt
- 1 cup pumpkin puree
- 1 cup heavy whipping cream, cold
- 1/2 teaspoon cinnamon
- 1/4 teaspoon nutmeg
- 1/8 teaspoon cloves
- 1/4 teaspoon ginger
- 1/8 teaspoon allspice
For the Topping:
- 1/2 cup melted Biscoff spread
Instructions
- Make the Crust: In a food processor, combine Biscoff cookie crumbs, pecans, light brown sugar, cinnamon, and sea salt. Pulse until finely ground. Add melted unsalted butter and mix until the crumbs are evenly moistened. Press the mixture firmly into the bottom of a lined 9×9-inch pan to form an even crust. Refrigerate the crust for 30 minutes to set.
- Prepare the Filling: In a large mixing bowl, beat the cream cheese until smooth and creamy using an electric mixer. Gradually add powdered sugar, pure vanilla extract, and sea salt, mixing thoroughly. Add the pumpkin puree, cold heavy whipping cream, cinnamon, nutmeg, cloves, ginger, and allspice. Beat on low speed to combine, then increase speed to medium-high and whip until the mixture forms medium-stiff peaks. Take care not to overbeat to maintain the perfect texture.
- Assemble the Bars: Pour the prepared pumpkin cheesecake filling over the chilled crust in the 9×9-inch pan, smoothing the top evenly. Refrigerate the assembled base for at least 4 hours or until fully set.
- Add the Topping: Warm the Biscoff spread in the microwave for 15 to 30 seconds until it becomes spreadable but not runny. Drizzle the melted Biscoff spread over the set pumpkin cheesecake layer. Use a spatula or toothpick to create swirled designs for added visual appeal.
- Chill and Serve: Return the bars to the refrigerator and chill for an additional hour (included in the total chill time) until the topping is set. Before serving, optionally sprinkle a pinch of sea salt on top to enhance the flavor. Cut into bars and serve chilled for a creamy, spiced treat.
Notes
- Be sure to use cold heavy whipping cream for better whipping results and texture.
- Do not overbeat the filling to prevent it from becoming too stiff or grainy.
- For a nut-free crust, substitute pecans with additional Biscoff cookie crumbs or seeds.
- Bars can be stored in the refrigerator for up to 4 days or frozen for longer storage.
- Allow the bars to come to room temperature for 10-15 minutes before serving for the best texture.


The spice balance in these no-bake bars is remarkable! Perfect for fall game nights – seasonal treats and quality entertainment like arion play slot create memorable gatherings. The Biscoff crust addition is genius!
Yo, anyone else on UG Play999.com? Been winning some, losing some, but having fun regardless. Check it out! ug play999.com
Yo, yy567gamevip is the place to be! Been playing here for a minute and their game selection is legit. Plus, they always got some kinda promo going on. Worth checking out for sure. yy567gamevip
Yo, gotta give props to linkv9bet. The odds are pretty competitive, and I’ve had some decent wins here. Their customer service is responsive too, which is a big plus in my book. linkv9bet