If you’re craving a decadent, bite-sized dessert that combines the rich charm of red velvet with the creamy indulgence of cheesecake, then you are going to adore this Red Velvet Cheesecake Brownie Bites Recipe. These little gems are moist, flavorful, and oh-so-irresistible, making them perfect for sharing—or sneaking a few secretly for yourself!
Why You Should Make This Recipe
Perfectly bite-sized indulgence: These brownies are small but packed with flavor, making them easy to enjoy without overindulging.
A heavenly combo: Red velvet and cheesecake meet in harmony for a dessert that feels gourmet but is surprisingly simple.
Impress without stress: No fancy equipment needed—just a few ingredients and simple steps for show-stopping results.
Great for any occasion: Whether it’s a party, holiday, or just a treat-yourself moment, these bites fit any vibe perfectly.

Ingredients & Substitutions
The magic of the Red Velvet Cheesecake Brownie Bites Recipe truly comes down to simple, everyday ingredients that each add something special—be it that classic cocoa richness, silky cream cheese tang, or that iconic red color and moist texture. Here’s a quick peek at what you’ll need:

- Unsalted Butter: Melting it brings out a lovely, smooth richness that helps carry the flavors.
- Sugar: Sweetens and balances the cocoa’s slight bitterness perfectly.
- Unsweetened Cocoa Powder: Provides the subtle chocolate note essential to red velvet.
- Red Food Coloring: That vibrant hue gives these bites their signature eye-catching appeal.
- White Vinegar: Enhances the red velvet’s tangy depth and reacts beautifully with baking ingredients for a tender crumb.
- Cream Cheese: Softened for silky cheesecake centers that contrast the brownie’s texture.
- Eggs: The binding agents that hold our brownie and cheesecake components together.
- Vanilla Extract: A splash adds warm notes that highlight every ingredient.
- All-Purpose Flour: The structural base that gives these treats their perfect chew.
How to Make Red Velvet Cheesecake Brownie Bites Recipe
Step 1: Prepare the brownie batter
Start by preheating your oven to 350ºF and greasing a mini muffin pan so nothing sticks. In a large bowl, whisk together melted butter, sugar, cocoa powder, vanilla, red food coloring, and salt until everything looks smooth and luscious. Stir in the vinegar next—it may feel odd, but it’s key for that classic red velvet tang. Then, gently mix in the eggs, and finally fold in the flour just until combined. The batter will be thick and rich, the perfect base.
Step 2: Make the cheesecake filling
While the brownie batter rests, whip up the cheesecake filling. Using a stand mixer or hand mixer, beat together softened cream cheese, sugar, vanilla, and a single egg yolk until the texture is smooth and creamy. Transfer this heavenly filling into a piping bag or a plastic bag with a tipped corner snipped off—this makes it SO much easier to portion later.
Step 3: Assemble the brownie bites
Now for the fun part! Use a small scoop or two teaspoons to dollop about a tablespoon of brownie batter into each mini muffin cup. Next, pipe roughly a teaspoon of your cheesecake mixture right on top, and then cover it with another teaspoon of brownie batter. Take a toothpick and gently swirl the layers together—this swirl is what makes these bites look as amazing as they taste.
Step 4: Bake and cool
Bake your red velvet cheesecake brownie bites for approximately 12 minutes, or until the cheesecake center looks set and the brownie edges are just pulling away. Let them cool in the pan for 5 minutes—this ease of release ensures they keep their perfect shape and won’t crumble.
How to Serve Red Velvet Cheesecake Brownie Bites Recipe

Garnishes
These bites are pretty show-stopping on their own, but a dusting of powdered sugar or a sprinkle of finely chopped pecans or white chocolate shavings adds a delightful touch. For extra flair, a small dollop of whipped cream or fresh raspberries on the side really elevates the presentation and taste.
Side Dishes
Pair these bites with a cup of rich coffee, creamy hot chocolate, or even a glass of chilled milk. Fresh fruit like strawberries or a light mixed green salad with a citrus vinaigrette creates an elegant contrast, balancing the richness of the dessert beautifully.
Creative Ways to Present
For a party, arrange the brownie bites on a tiered dessert stand or a rustic wooden board surrounded by edible flowers or mint leaves. You can also pop each bite in mini cupcake liners for easy grabbing or drizzle melted white chocolate across the top for that extra wow factor. Presentation really sets the mood!
Make Ahead and Storage
Storing Leftovers
If you have any leftovers (though that’s rare!), store the Red Velvet Cheesecake Brownie Bites Recipe in an airtight container in the fridge. Layer them with parchment or wax paper to keep them from sticking together, and they’ll stay fresh and delicious for about 3 to 5 days—perfect for nibbling throughout the week.
Freezing
While tempting, freezing these isn’t recommended. The creamy cheesecake center can separate, resulting in a less-than-ideal texture once thawed. For best results, enjoy fresh or refrigerated.
Reheating
To warm them up, pop the bites in the microwave for about 10 seconds just to take the chill off—the cheesecake filling will stay wonderfully creamy without drying out. Avoid overheating, as these treats are best enjoyed soft and luscious.
FAQs
-
Can I make these Red Velvet Cheesecake Brownie Bites gluten-free?
Absolutely! Just swap out the regular all-purpose flour for a gluten-free blend designed for baking. Make sure your cocoa powder is gluten-free as well, and you’ll have a delicious gluten-free version that doesn’t compromise on taste or texture.
-
What if I don’t have red food coloring on hand?
Red food coloring is key for that classic red velvet look, but if you’re out, you can use natural alternatives like beet juice, though it may slightly alter the flavor and color. Without any coloring, the taste will still be incredible but more like a traditional chocolate cheesecake brownie.
-
Can I make the brownie and cheesecake parts ahead separately?
You could prepare the batter and cheesecake filling in advance; just store them in airtight containers in the fridge for up to one day. Assemble and bake the bites fresh for the best texture and flavor.
-
How can I tell when the cheesecake brownie bites are done baking?
Look for the cheesecake portion to be set and not jiggly, and that the brownie edges start to pull slightly from the pan. They should still be moist in the center, so avoid over-baking to keep that perfect soft texture.
Final Thoughts
There’s something so joyful about sinking your teeth into these luscious Red Velvet Cheesecake Brownie Bites Recipe—they’re a celebration of flavor and texture in every single bite. Whether you’re making them for a special occasion or a cozy day in, these treats are guaranteed to make hearts and taste buds very happy. Give them a try and watch how quickly they disappear!
Print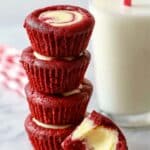
Red Velvet Cheesecake Brownie Bites Recipe
- Prep Time: 20 minutes
- Cook Time: 12 minutes
- Total Time: 32 minutes
- Yield: 30 brownie bites 1x
- Category: Dessert
- Method: Baking
- Cuisine: American
Description
These Red Velvet Cheesecake Brownie Bites are a delightful treat combining rich, fudgy red velvet brownie with a creamy cheesecake center, perfect for parties or an indulgent snack. Baked in a mini muffin pan, they boast a beautiful swirl of vibrant red brownie and luscious cheesecake filling, delivering a balance of chocolaty and tangy flavors in every bite.
Ingredients
For the brownies:
- 8 tablespoons unsalted butter, melted
- 1 cup sugar
- 1/4 cup unsweetened cocoa powder
- 1/2 teaspoon vanilla extract
- 1 tablespoon red food coloring
- 1/8 teaspoon salt
- 1/2 teaspoon white vinegar
- 2 large eggs, lightly whisked
- 3/4 cup all-purpose flour
For the cheesecake filling:
- 1 (8-oz.) package cream cheese, softened
- 3 tablespoons sugar
- 1/2 teaspoon vanilla extract
- 1 large egg yolk
Instructions
- Preheat and prepare pan: Preheat your oven to 350ºF (175ºC). Grease a mini muffin pan thoroughly with cooking spray to ensure the brownie bites do not stick.
- Make the brownie batter: In a large bowl, combine melted butter, sugar, cocoa powder, vanilla extract, red food coloring, and salt. Stir well until all ingredients are well blended. Then stir in the white vinegar. Add the lightly whisked eggs and mix until smooth. Fold in the all-purpose flour gently just until incorporated to avoid overmixing.
- Prepare the cheesecake filling: Using a stand mixer fitted with the paddle attachment, beat the softened cream cheese with sugar, vanilla extract, and egg yolk until the mixture is smooth and creamy. Transfer this cheesecake mixture to a piping bag or a sealable plastic bag with a small tip cut off for easy piping.
- Assemble the brownie bites: Using a small ice cream scoop or two small spoons, spoon about 1 tablespoon of brownie batter into each well of the mini muffin pan. Pipe approximately 1 teaspoon of cheesecake filling on top of the brownie batter in each cavity. Then add another teaspoon of brownie batter over the cheesecake. Take a toothpick and gently swirl the brownie and cheesecake mixtures together to create a marbled effect.
- Bake: Place the pan in the preheated oven and bake for about 12 minutes, or until the cheesecake filling is fully cooked and the brownie edges are set. Keep an eye on them so they don’t overbake.
- Cool and serve: Remove the pan from the oven and let the brownie bites cool in the pan for about 5 minutes before transferring them to a wire rack to cool completely. This helps them set and makes removal easier.
Notes
- Store the brownie bites in an airtight container in the refrigerator to keep them fresh for 3 to 5 days.
- Place parchment or wax paper between layers if stacking to prevent sticking.
- Freezing is not recommended as it can alter the creamy texture of the cheesecake center and affect the overall consistency.


