If you’ve ever dreamed of baking your own bakery-quality loaf right at home without the fuss of kneading, you’re in for a treat with this Roasted Garlic & Rosemary No-Knead Artisan Bread Recipe. This fragrant, crusty bread blends the comforting richness of roasted garlic and the herbal freshness of rosemary, all coming together in a delightfully chewy, golden loaf that you’ll want to slice again and again.
Why You Should Make This Recipe
Simplified baking process: No kneading means less time and effort, perfect for busy days or beginners.
Deep, aromatic flavor: Roasted garlic and fresh rosemary infuse the bread with irresistible savory notes.
Crunchy crust with tender crumb: Achieve that perfect artisan crust without specialized equipment.
Versatile and impressive: Makes a stunning centerpiece for any meal, from casual to fancy dinners.

Ingredients & Substitutions
Don’t be intimidated by the ingredient list—it’s refreshingly straightforward! Each ingredient plays a vital role: the flour provides the backbone, the roasted garlic injects mellow sweetness, rosemary offers aromatic herbiness, and the yeast effortlessly brings the dough to life with its airy texture. Together, they create a harmony of taste and structure.

- Roasted garlic: Roasting softens the garlic’s sharpness and adds a caramelized richness that’s pure magic in every bite.
- Olive oil: Used to roast the garlic, it enhances the mellow flavor and aids in the roasting process.
- All-purpose flour: The foundation of the dough; you can substitute half with bread flour for more chewiness.
- Kosher salt: Vital for seasoning and enhancing all the other flavors in the bread.
- Active dry yeast: The quiet workhorse that gives your dough that beautiful rise and light texture.
- Fresh rosemary: Chopped finely, it provides herbal brightness that complements the roasted garlic perfectly.
- Room temperature water: Essential for hydrating the flour and activating the yeast, room temp keeps the yeast happy and lively.
How to Make Roasted Garlic & Rosemary No-Knead Artisan Bread Recipe
Step 1: Roast the Garlic
Start by preheating your oven to 425°F. Slice off the top of a garlic bulb to reveal the cloves, drizzle a tablespoon of olive oil on top, then wrap it tightly in foil. Roast for about 45 minutes until the garlic is soft and fragrant. Once cool, squeeze the roasted garlic cloves out of their skins—this creamy, mellow garlic is going to be a flavor game changer in your bread.
Step 2: Mix the Dough
In a large bowl, whisk together flour, kosher salt, yeast, chopped rosemary, and your freshly squeezed roasted garlic. Pour in 1 ½ cups of room temperature water and stir gently until a shaggy dough forms—no need to overwork it. Cover the bowl tightly with plastic wrap and let it rest at room temperature for 12–18 hours. This long fermentation develops deep flavor and gives you that lovely airy bread texture.
Step 3: Prepare to Bake
When you’re ready to bake, place your Dutch oven, pizza stone, or any oven-safe heavy pot into the oven and set it to preheat at 450°F. This helps create that signature crispy crust by trapping steam and evenly distributing heat inside the pot.
Step 4: Shape and Bake the Dough
On a well-floured surface, turn the sticky dough out and gently shape it into a round loaf using floured hands—resist the urge to add too much flour; a slightly sticky dough leads to a moist interior. Carefully transfer the dough ball into your preheated pot (using a sheet of parchment paper underneath makes this easier). Cover with the lid and bake for 30 minutes, then remove the lid and bake for another 10–15 minutes until beautifully golden-brown and crusty on top.
Step 5: Cool and Enjoy!
Remove your masterpiece from the oven and let it cool completely on a wire rack before slicing. This rest time is crucial—it allows the crumb to set and prevents your bread from becoming gummy when sliced. Get ready for slices bursting with roasted garlic aroma and the fresh pop of rosemary!
How to Serve Roasted Garlic & Rosemary No-Knead Artisan Bread Recipe

Garnishes
A brush of softened butter or a drizzle of high-quality olive oil on warm slices elevates this bread even more. Sprinkle a pinch of flaky sea salt or fresh cracked pepper to highlight the crust’s texture. You can also spread it with whipped herb butter or a smear of tangy goat cheese for an extra flavor pop.
Side Dishes
This artisan bread pairs beautifully with soups like creamy tomato basil or hearty lentil. It’s also a fantastic companion to charcuterie boards, vibrant salads, or alongside roasted vegetables. The deep garlic and rosemary flavors make it a fantastic base for bruschetta or open-faced sandwiches.
Creative Ways to Present
For a rustic vibe, serve the loaf whole on a wooden cutting board with a serrated knife for guests to slice themselves. Or create individual servings by cutting the bread into thick slices and topping with a mix of whipped feta, chopped tomatoes, and fresh basil—an easy appetizer that wows! You can also hollow out the loaf slightly and fill it with a warm dip for a charming party presentation.
Make Ahead and Storage
Storing Leftovers
Store leftover bread wrapped loosely in a clean kitchen towel or paper bag to maintain the crust’s crispness while keeping the inside soft. Avoid airtight containers which tend to soften the crust quickly. Bread is best consumed within two days for optimal freshness.
Freezing
This bread freezes wonderfully! Simply slice and wrap individual slices or the whole loaf tightly in plastic wrap, then place in a freezer-safe bag. When you want fresh bread, thaw at room temperature or toast slices straight from the freezer for a quick treat.
Reheating
To revive the crust and bring out those beautiful aromas, pop your bread in a 350°F oven for 10-15 minutes. This quick reheat will restore that perfect crunchy crust and warm the soft interior, almost like it just came out of the oven.
FAQs
-
Can I use bread flour instead of all-purpose flour?
Absolutely! Bread flour can be swapped one-to-one with all-purpose flour in this recipe. It will give your bread a chewier texture and a slightly better rise, but all-purpose flour works beautifully too, especially since this recipe’s hydration is on the higher side.
-
Do I really need to let the dough rest for 12-18 hours?
Yes, that long fermentation is essential for developing the bread’s flavor and texture. The slow rise at room temperature lets the yeast work gently, creating those delightful air pockets and the signature complex taste of artisan bread.
-
Can I add other herbs or flavors instead of rosemary?
Definitely! Thyme, oregano, or even fresh basil can be great alternatives depending on your preference. Just be mindful of the quantities so the herbs complement, rather than overpower, the roasted garlic in this recipe.
-
What if I don’t have a Dutch oven—can I still bake this bread?
You can! A heavy oven-safe pot with a lid or even a covered baking dish will work well to retain steam for a crisp crust. Alternatively, baking on a pizza stone and spraying the oven with water can help mimic a steamy environment to improve crust formation.
Final Thoughts
I can’t recommend this Roasted Garlic & Rosemary No-Knead Artisan Bread Recipe enough—it’s a true treasure to bake and share. Whether you’re a seasoned baker or just starting out, the ease and rewarding flavors make it a joy to create. So grab that garlic, roll up your sleeves, and fill your kitchen with the comforting aromas of homemade artisan bread. You won’t regret it!
Print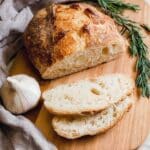
Roasted Garlic & Rosemary No-Knead Artisan Bread Recipe
- Prep Time: 5 minutes
- Cook Time: 45 minutes
- Total Time: 12 hours 50 minutes
- Yield: 1 loaf (about 1.5 to 2 pounds) 1x
- Category: Bread
- Method: Baking
- Cuisine: American
- Diet: Vegetarian
Description
A simple and rustic no-knead artisan bread infused with roasted garlic and fresh rosemary. This recipe uses a long fermentation time to develop flavor and texture, resulting in a crusty, golden-brown loaf with a tender crumb that is perfect for sandwiches, toasting, or enjoying with olive oil.
Ingredients
Roasted Garlic
- 1 head garlic, roasted
- 1 Tablespoon olive oil
Dough
- 3 cups (423g) all-purpose flour (or substitute with bread flour)
- 1 1/2 teaspoons kosher salt
- 1/2 teaspoon active dry yeast
- 1 1/2 cups room temperature water
- 1 Tablespoon fresh rosemary, chopped
Instructions
- Roast the Garlic: Preheat the oven to 425°F (220°C). Slice the top off the head of garlic to expose the cloves, drizzle 1 tablespoon olive oil over the exposed cloves, wrap tightly in foil, and roast for 45 minutes. Remove and let cool until the cloves are soft and can be easily squeezed out of the skins.
- Prepare the Dough: In a large mixing bowl, combine the flour, kosher salt, active dry yeast, chopped rosemary, and the roasted garlic cloves (squeezed out of their skins). Add 1 1/2 cups of room temperature water and stir until a shaggy, sticky dough forms. Cover the bowl tightly with plastic wrap and let it rest at room temperature for 12 to 18 hours to ferment and rise.
- Preheat the Oven and Baking Vessel: When ready to bake, place a heavy Dutch oven, pizza stone, or oven-safe deep pan with its lid (or an oven-safe bowl as a cover) inside the oven and preheat to 450°F (232°C) for at least 30 minutes.
- Shape the Dough: On a clean, well-floured surface, carefully turn the risen dough out. Using floured hands, shape it gently into a ball. The dough will be very sticky, so flour your hands well to handle it.
- Bake the Bread Covered: Carefully transfer the dough ball into the preheated Dutch oven or baking vessel. Cover with the lid or oven-safe bowl and bake for 30 minutes. This traps steam and helps develop a crisp crust.
- Finish Baking Uncovered: Remove the lid and bake for an additional 10 to 15 minutes until the crust is golden brown and crisp to your liking.
- Cool Before Slicing: Remove the bread from the oven and transfer it to a wire rack to cool completely before slicing. This allows the crumb to set properly.
Notes
- You can use bread flour instead of all-purpose flour for a chewier texture and better rise, or use a combination of both.
- Preheating the Dutch oven prevents sticking, but if you’re worried, place the shaped dough on parchment paper before transferring it into the Dutch oven for easier removal.
- This recipe is adapted from The Comfort of Cooking via Simply So Good, a classic method for crusty no-knead bread that has stood the test of time.


