Description
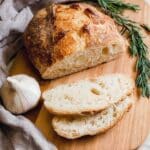
A simple and rustic no-knead artisan bread infused with roasted garlic and fresh rosemary. This recipe uses a long fermentation time to develop flavor and texture, resulting in a crusty, golden-brown loaf with a tender crumb that is perfect for sandwiches, toasting, or enjoying with olive oil.
Ingredients
Scale
Roasted Garlic
- 1 head garlic, roasted
- 1 Tablespoon olive oil
Dough
- 3 cups (423g) all-purpose flour (or substitute with bread flour)
- 1 1/2 teaspoons kosher salt
- 1/2 teaspoon active dry yeast
- 1 1/2 cups room temperature water
- 1 Tablespoon fresh rosemary, chopped
Instructions
- Roast the Garlic: Preheat the oven to 425°F (220°C). Slice the top off the head of garlic to expose the cloves, drizzle 1 tablespoon olive oil over the exposed cloves, wrap tightly in foil, and roast for 45 minutes. Remove and let cool until the cloves are soft and can be easily squeezed out of the skins.
- Prepare the Dough: In a large mixing bowl, combine the flour, kosher salt, active dry yeast, chopped rosemary, and the roasted garlic cloves (squeezed out of their skins). Add 1 1/2 cups of room temperature water and stir until a shaggy, sticky dough forms. Cover the bowl tightly with plastic wrap and let it rest at room temperature for 12 to 18 hours to ferment and rise.
- Preheat the Oven and Baking Vessel: When ready to bake, place a heavy Dutch oven, pizza stone, or oven-safe deep pan with its lid (or an oven-safe bowl as a cover) inside the oven and preheat to 450°F (232°C) for at least 30 minutes.
- Shape the Dough: On a clean, well-floured surface, carefully turn the risen dough out. Using floured hands, shape it gently into a ball. The dough will be very sticky, so flour your hands well to handle it.
- Bake the Bread Covered: Carefully transfer the dough ball into the preheated Dutch oven or baking vessel. Cover with the lid or oven-safe bowl and bake for 30 minutes. This traps steam and helps develop a crisp crust.
- Finish Baking Uncovered: Remove the lid and bake for an additional 10 to 15 minutes until the crust is golden brown and crisp to your liking.
- Cool Before Slicing: Remove the bread from the oven and transfer it to a wire rack to cool completely before slicing. This allows the crumb to set properly.
Notes
- You can use bread flour instead of all-purpose flour for a chewier texture and better rise, or use a combination of both.
- Preheating the Dutch oven prevents sticking, but if you’re worried, place the shaped dough on parchment paper before transferring it into the Dutch oven for easier removal.
- This recipe is adapted from The Comfort of Cooking via Simply So Good, a classic method for crusty no-knead bread that has stood the test of time.