

If you’ve been searching for a snack that’s both delightful and unexpectedly healthy, let me introduce you to the Cheesy Zucchini Breadsticks (Crispy, Cheesy & So Irresistible!) Recipe. These breadsticks combine the fresh, tender goodness of zucchini with layers of melty cheese and a crisp, golden crust that will have everyone asking for seconds. Trust me, once you try these, they’ll fast become a cherished favorite in your kitchen!
Why You Should Make This Recipe
Super simple ingredients: This recipe uses everyday staples you likely already have, making it easy to whip up anytime.
Healthy twist on comfort food: Sneak in extra veggies without sacrificing the cheesy, crispy textures you love.
Perfect for any occasion: Whether it’s a family snack, party appetizer, or side dish, these breadsticks fit beautifully.
Customizable and versatile: You can tweak the herbs, cheeses, or dipping sauces to suit your taste buds perfectly.

Ingredients & Substitutions
Every ingredient in the Cheesy Zucchini Breadsticks (Crispy, Cheesy & So Irresistible!) Recipe plays a vital role in creating the ideal balance of flavor, texture, and appearance. From the fresh zucchini providing moisture and lightness, to the cheese delivering gooey richness, each element is essential. If you’re ready to gather these simple essentials, here’s what you’ll need:

- Zucchini: Fresh, medium-sized zucchinis shredded to create the base and moisture for the breadsticks.
- Eggs: Bind everything together and help establish the crisp, firm texture.
- Mozzarella cheese: Used both inside the mixture and as a topping to provide melty, stretchy cheesy goodness.
- Parmesan cheese: Adds a sharp, savory flavor that complements the zucchini perfectly.
- Garlic powder & Italian seasoning: These herbs and spices bring wonderful aroma and flavor depth.
- Salt and pepper: Vital for seasoning and enhancing all the other flavors.
- Optional fresh parsley or basil: For a fresh, colorful garnish that brightens each bite.
How to Make Cheesy Zucchini Breadsticks (Crispy, Cheesy & So Irresistible!) Recipe
Step 1: Prepare the Zucchini
Begin by preheating your oven to a sizzling 425°F (220°C) and lining a baking sheet with parchment paper to prevent sticking. Shred your zucchinis using a box grater or food processor—whatever feels easier. The secret to crispy breadsticks is squeezing out every drop of excess water from the shredded zucchini using a clean kitchen towel or cheesecloth—trust me, this keeps sogginess at bay and ensures a firm, golden crust.
Step 2: Mix the Crust Ingredients
In a large bowl, combine your dried and squeezed zucchini with eggs, ½ cup mozzarella, Parmesan cheese, garlic powder, Italian seasoning, salt, and pepper. Mix everything thoroughly until the ingredients are well integrated into a uniform mixture. This blend is your base, which will transform into those irresistibly crispy and cheesy sticks you’ve been dreaming of!
Step 3: Shape and Bake
Spread the zucchini mixture evenly onto your prepared baking sheet, pressing it firmly into a thin rectangular shape. Make sure it’s as even as possible — this helps it cook uniformly. Pop it in the oven and bake for 20 to 25 minutes, or until the edges turn golden and the crust feels firm when touched. Your kitchen will start smelling wonderfully inviting right about now!
Step 4: Add Cheese Topping and Finish Baking
Remove the baking sheet from the oven and quickly sprinkle the remaining 1 cup of mozzarella cheese evenly over the top. Return it to the oven for another 5 to 7 minutes until the cheese melts into glorious bubbly perfection. You can almost hear the satisfying sizzle, signaling these breadsticks are just about ready to make their grand entrance on your plate!
Step 5: Slice and Serve
Allow the breadsticks to cool just enough to handle safely, then slice them into sticks or squares — whatever shape you prefer! Garnish with fresh parsley or basil if you like, which lends a lovely vibrant freshness. Serve warm alongside your favorite marinara or ranch dipping sauce for that extra zing of flavor.
How to Serve Cheesy Zucchini Breadsticks (Crispy, Cheesy & So Irresistible!) Recipe

Garnishes
Fresh herbs like parsley or basil are perfect for sprinkling on top just before serving—they add a pop of color and a clean, herbaceous note that balances out the richness of the cheese. You could also dust a little extra Parmesan for a salty finish or sprinkle red pepper flakes for a touch of heat.
Side Dishes
Pair these cheesy zucchini breadsticks with a fresh garden salad or a light, wholesome soup to make a balanced meal. They also go brilliantly as an appetizer alongside a hearty pasta dish or a cozy bowl of chili. And, of course, marinara and ranch dips are classic companions that no one will want to skip!
Creative Ways to Present
For a fun twist, serve your breadsticks in a rustic bread basket lined with parchment paper or arrange them artfully on a wooden board surrounded by small bowls of dipping sauces and garnishes. You might even create mini sandwiches using the breadsticks as the “bread” and stuff them with fresh veggies or meats for a unique appetizer offering.
Make Ahead and Storage
Storing Leftovers
Once cooled, store any leftover cheesy zucchini breadsticks in an airtight container in the refrigerator. They will stay fresh for up to 3 days while maintaining good texture and flavor. Just be sure to keep them sealed well to avoid moisture softening that crispy crust!
Freezing
You can freeze these breadsticks to enjoy later by placing cooled and individually wrapped pieces in a freezer-safe bag or container. Freeze for up to 2 months. When you’re ready to eat, thaw them overnight in the fridge before reheating for best results.
Reheating
To reheat, pop your breadsticks in a 350°F oven for about 10 minutes or until warmed through and crispy again. Avoid microwaving if possible as it can make them soggy, but in a pinch, a quick 20-second zap with a skillet finish can bring back some crunch.
FAQs
-
Can I use other types of cheese in this recipe?
Absolutely! While mozzarella and Parmesan provide great melt and flavor, you can experiment with cheddar, Monterey Jack, or even a bit of feta for a tangy twist. Just keep in mind that different cheeses may alter the texture slightly.
-
How do I prevent the zucchini breadsticks from becoming soggy?
The key is squeezing out as much moisture as possible from the shredded zucchini before mixing it with the other ingredients. Using a clean towel or cheesecloth to press out water ensures your breadsticks crisp up beautifully in the oven.
-
Can I make this recipe gluten-free?
This recipe is naturally gluten-free since it contains no wheat flour or breadcrumbs. Just double-check your seasonings and cheese to ensure they’re free from any additives with gluten, and you’re good to go!
-
What dipping sauces pair best with these breadsticks?
Classic marinara is a fantastic match, but ranch, garlic aioli, or even a spicy sriracha mayo can elevate these breadsticks to the next level. Feel free to get creative and find your favorite combo!
Final Thoughts
Making this Cheesy Zucchini Breadsticks (Crispy, Cheesy & So Irresistible!) Recipe will not only satisfy your snack cravings but also bring a warm smile to your table. They’re easy to prepare, comforting, and full of flavor — a perfect way to enjoy veggies in a fun new way. I can’t wait for you to try them and share these crunchy, cheesy delights with your loved ones!
Print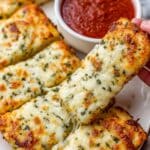
Cheesy Zucchini Breadsticks (Crispy, Cheesy & So Irresistible!) Recipe
- Prep Time: 15 minutes
- Cook Time: 25 minutes
- Total Time: 40 minutes
- Yield: 8–10 breadsticks 1x
- Category: Appetizer
- Method: Baking
- Cuisine: Italian-American
- Diet: Gluten Free
Description
These Cheesy Zucchini Breadsticks are a deliciously crispy and cheesy snack made with shredded zucchini, mozzarella, and Parmesan cheese. Perfect as an appetizer or side, they combine fresh herbs and seasonings for irresistible flavor and a satisfying crunch.
Ingredients
Breadstick Mixture
- 2 medium zucchinis (about 2 cups shredded)
- 2 large eggs
- ½ cup shredded mozzarella cheese
- ¼ cup grated Parmesan cheese
- 1 teaspoon garlic powder
- 1 teaspoon Italian seasoning
- ½ teaspoon salt
- ¼ teaspoon black pepper
Topping
- 1 cup shredded mozzarella cheese
- Optional: fresh parsley or basil for garnish
Instructions
- Prepare zucchini: Preheat the oven to 425°F (220°C) and line a baking sheet with parchment paper. Shred the zucchinis using a box grater or food processor. Place the shredded zucchini into a clean kitchen towel or cheesecloth and squeeze out as much moisture as possible to prevent soggy breadsticks.
- Make the crust: In a large mixing bowl, combine the shredded zucchini, eggs, ½ cup mozzarella cheese, Parmesan cheese, garlic powder, Italian seasoning, salt, and black pepper. Mix thoroughly until well combined.
- Shape and bake: Spread the zucchini mixture evenly onto the prepared baking sheet, pressing it into a thin, even rectangle. Bake in the preheated oven for 20 to 25 minutes, or until the crust is golden brown and firm to the touch.
- Add cheese topping: Remove the baking sheet from the oven and evenly sprinkle 1 cup of shredded mozzarella cheese on top. Return to the oven and bake for an additional 5 to 7 minutes, or until the cheese is melted and bubbly.
- Slice and serve: Allow the breadsticks to cool slightly before slicing into individual pieces. Garnish with fresh parsley or basil if desired, and serve warm with marinara or ranch dipping sauce for a tasty treat.
Notes
- Be sure to squeeze out as much liquid from the zucchini as possible to avoid soggy breadsticks.
- Use parchment paper to prevent sticking and make cleanup easier.
- You can substitute Italian seasoning with a mix of dried oregano, basil, and thyme if desired.
- Serve with marinara or ranch dipping sauces for added flavor.
- Store leftovers in an airtight container in the refrigerator for up to 3 days and reheat in the oven for best texture.



This ‘classical treatise’ sounds comprehensive, but for true beginners, the sheer number of banners is overwhelming. Focus on the core mechanics first; checking out jiliqq login might simplify the initial learning curve.